Terry's Music site - Barefootterry | home
Mailing List Letters 1.5
(Some of the links wont work,
Im seperating the page, major domo letters,
into 3 pages. So please bare with me.)
 The Ripper
---------------------
Tony,
I dont use it, cause I still havent figured out how to hook it up to my
comupters. I dont think my sound card has a Midi in out port. I almost
made an attempt to buy the USB midi in-out cable. But I think they wanted
to $76 for that damn cable, which discouraged me a bit.
But hey, you have done I great job programming the Ripper. I know a little
bit of VB and C++, and I know how frustrating it can get. HOw on earth did
you program that thing....I wouldnt even dare try...ya must be genius.
What sound card do you use? Does SB live have midi in/out with it? Is SB
the best out there (man it is really expensive!!) I have soundMAX which came
with the computer. It sounds fine. I am not sure if I should buy another
one. If I did, what qualities would I look for in the sound card. Is 24
bit ADA the best out there now, and is this all that matters in a soundcard?
What is 96 hz or something? Or far easier, is there a website where I can
get all this info?
Man where is time to play when you have to do so much research....hah...
But again....great job with ripper. I am sure it is appreciated by all
RP2000 users :)
Thanks man.
Sonnet
----------------------
Hi,
> I dont use it, cause I still havent figured out how to hook it up to my
> comupters.
It's not difficult. You need a MIDI adapter and 2 MIDI cables.
>I dont think my sound card has a Midi in out port.
Probably not, most don't come with one. You need a MIDI adapter that
connects to the game port. I think I have a link in the FAQ
(http://rushtabs.tripod.com/FAQ.txt) to a place that sells them for around
$25.
>I almost made an attempt to buy the USB midi in-out cable. But I think they wanted
> to $76 for that damn cable, which discouraged me a bit.
That's not bad. I want a multiport MIDI thing. I have too many MIDI devices
in my studio and not all have MIDI thru. When I want to use the RP, I have
to unplug the drum machine.
> But hey, you have done I great job programming the Ripper. I know a
>little bit of VB and C++, and I know how frustrating it can get. HOw on earth
>did you program that thing....I wouldnt even dare try...ya must be genius.
I lost a lot of hair. :) It's up in the tens of thousands of lines of code
by now, and I'm not finished yet. I program for a living. I used to do a
lot of hardware device interfaces for lab test equipment, and this is
similar. It's all in Visual C++ by the way. The MIDI implementation was
the hardest part. My next big project is a VXTi/VST effect host for Tuareg
(www.brambos.com) that'll keep me busy.
> What sound card do you use? Does SB live have midi in/out with it?
SBLive Platinum. With the LiveDrive which has the MIDI in/out.
> Is SB the best out there (man it is really expensive!!)
No way. It's actually not that wonderful a sound card (16 bit/48khz, crappy
latency with the SB drivers, PCI problems.) It's definitely an amateur
level card. Except for the sound fonts, I'd get an M-Audio Audiophile 2496
for $150. Actually, that's on my wish list. Right after the new mixer and
a bass. :)
You can get decent recordings with the SBLive, but there are better cards
out there for the same price.
>I have soundMAX which came with the computer. It sounds fine.
> I am not sure if I should buy another one.
>If I did, what qualities would I look for in the sound card. Is 24
> bit ADA the best out there now, and is this all that matters in a
soundcard?
I'd get one with 24 bit, 96khz recording. The Echo Mia and the Audiophile
are both reasonably priced (under $200) and quite nice. Make sure it's got
ASIO and/or WDM drivers. be sure it's compatible with your recording
software.
> What is 96 hz or something? Or far easier, is there a website where I can
> get all this info?
where they had sound card reviews, but I can't find it anymore.
> Man where is time to play when you have to do so much research....hah...
Dunno. I have too many things to do already! That's why it took so long to
update Ripper. Too much fun stuff to do!
> But again....great job with ripper. I am sure it is appreciated by all
> RP2000 users :)
Thanks,
> Thanks man.
You're welcome.
-=-=-=-=-=-=-
Tony
---------------------------
Soldering
some ideas for beginers and pros
Hello RP friends,
Bill Bores here.
A 15 / 30 dual watt soldering pencil from Radio Shack will work well.
P.N. 910-3695 Price $9.99
I have about a dozen soldering irons, pencils, Weller station, miniature
torches, and the 15/30 watt unit is my most recent purchase.
Here is something that a new learner will likely have trouble. Too muchheat in
the wrong place. The heat melts the insulation, destroys semi
conductive components, transistors, IC, diodes, etc. and removes the
circuit foil.
The problem we encounter when making our own cords, in the list above,
is melting the insulation.
Solution: Use a heat sink. A heat sink is an aluminum clip or tiny
needle nose pliers. Put on on either side of the solder joint and this
will give you a ton of time to watch the solder flow.
Follow Kevin McQuade's suggesting soldering. Get some scrap pieces of
wire and have a good time practicing.
Get a sponge, wet it, and use this to keep you tip clean. Each time
before you solder, wipe the tip on the sponge. This will remove
oxidized solder and contaminants and prepare the tip. Apply a small
amount of solder to the tip and quickly put the tip so that it touches
both pieces of work to be soldered.
Heat will flow in both directions. Keeping the tip in place, touch the
solder at the point where all three meet.
Kevin's point about the good flow is what you will have to learn from
doing this. The cooling to a solid shiny joint he mentions is the heart
of a good solder joint.
If you move either piece before it cools, it will look frosty and not
shiny.
Good luck Sonnet,
Bill
------------------------
The brown stuff is called flux. It helps the solder flow. It's very useful,
but it's also corrosive, so you have to use an acid brush (a small stiff
bristle brush) and some alcohol or flux remover to remove the excess when
you're done. Also, it'll give off vapor when you solder- try not to breathe
too much of it. I doubt that it's good for you!!
There have been some good tips given here, so I'll add mine. As far as I'm
concerned, you absolutely have to have well tinned wires to start with.
Tinning your wires means wicking some solder on them before you solder the
joint. It goes like this:
1. Strip the insulation off your wires back about 1/2 inch
2. Take the bare wire and twist it between your thumb and forefinger so it's
nice and tight and straight and all the strands are nicely twisted together.
3. Run some flux the length of the twisted wire (I keep some flux in an old
nail polish bottle- the little brush in the cap is perfect for this job!!)
4. Pick up your iron, hit the wet sponge with both sides of it, the put a
nice little dab of solder on the tip of the iron
5. Now, take your iron in one hand and the twisted, fluxed wire end in the
other, and run the little dab of solder along the wire from underneath,
starting just short of the insulation and going all the way off the end in
one smooth, slow, motion (not too slow or the insulation will melt!!). The
capillary action of the wire along with the flux should draw the solder up
into the twisted strands.
The result should be a nice shiny finish, with the individual strands just
barely visible beneath the solder. The wire end should be stiff, solid, and
should not break up when you take a pair of small needle nose pliers and
bend the tip of the wire into a nice little hook to go into that little hole
in the jack end. Slide the tinned wire hook into the little hole, add a
little more flux to both pieces (a small tabletop vise or clamp will free up
a hand!), pick up your iron, hit both sides of it on the wet sponge again,
tin the tip a little (you can either use solder to tin the iron tip, or you
can get a little can of tip tin, but always keep your tip tinned- it aids
good heat /solder flow, and it keeps your tip from burning out. You know
your tip is burned out when solder slides off of it rather than sticking to
it! Tin your iron before you put it down, and before you turn it off, too).
Then lay the iron along side the tinned wire/jack joint, touching the jack
right up along side the wire, add a little solder in between the two, the
watch the whole thing heat up until you see the surface tension of the
solder break up and the whole thing just flows together around wire and
evenly onto the jack (extra points if you get a nice even flow that
completely fills the hole without making a big blob!!). As soon as you see
it flow, remove the iron, then hold everything nice and steady without
moving until you see everything solidify again. Clean off any excess flux
with an acid brush dipped in some alcohol. A good solder joint will be
smooth, fairly thin, and nice and shiny. You should be able to see the wire
underneath the solder, and, contrary to the old technician's joke, "the
bigger the blob the better the job" just ain't so!!!
Good Luck-
Mike
The Axeman (##(===>>
GZS Muzik
www.gzsmuzik.com
---------------------
One of the most important things the flux does is to isolate the soldered
surfaces from the air. This discourages any oxidation in the soldering
process due to heat and ambient air reacting during heat up. Helps for
making a solid long lasting joint. Copper contacts like foil strips and
components for boards are really susceptible to oxidation and must be kept
perfectly clean when your working on them. A little finger grease or oily
residue can make a joint impossible to solder right.
Just my 2 cents in the mix here.
DT
--------------------
Rosin is brown. If you buy solder at Radio Shack, note that is is rosin
filled. So you won't have to add any. The purpose of rosin is to keep help the
solder flow easily onto the metals parts.
The big gun was a soldering gun which typically range in wattage from 120 Watts
to 240 watts and up. I have one that is 500 Watt. These are necessary for
soldering on a chassis or large connectors and wires where the mass of the metal
takes a lot of energy to get the place to be soldered hot enough to melt the
solder.
When soldering, we should make sure the solder touches the parts to be
soldered. When they get hot enough for the solder to melt, and both of them are
at least the proper temperature, a good solder joint can be formed.
Thanks,
Bill
-------------------------
PERFECT TUNING?
see Harmonics
Theoretically, a guitar cannot be in perfect tune. An neither can a pedal
steel guitar. A steel guitar has no intonation adjustments.
So here is a contest question.
Why is it that a pedal steel guitar which does not have intonation adjustments,
and can have the same scale length as a 6 string electric, and string gauge range, sound
more in tune and the chords more rich and harmonious?
String density is part of this tuning phenomenon, but so is the size and
design of the piano. If you were to use the same size strings on two different
piano's they would have to be tuned differently in order to 'sound' in tune.
There are personal preferences that some owners of piano's have that will
change how a piano is tuned. They might express this by saying that it doesn't sound happy
enough, or it just sounds too sad or dark. Even though the piano is theoretically in tune
with itself and properly in pitch with a tuning standard, A440 might need to be A442 or A443.
This is really an odd thing that harmonics do with our brain and psychology.
You have no doubt noticed the following:
Guitar has a new set of strings, intonation is set properly, action and everything
is great. The guitar will tune to open strings but on some songs, can be tuned
a bit better based upon the key you are playing in. This is related to
overtones, harmonics, and your particular instrument and the key you are playing in.
Personally, I just know all this stuff, tune with a tuner, and occasionally
adjust the B string a bit sharp, sometimes and it depends on my mood
and the song. Mainly, if it sounds good and pleasing that is all I care about.
Bill
---------------------
Virtural Tracks
Smaller digital recorders use the virtual track scheme to get higher
recorded track counts with limited processing power. It works like this:
Say you have a digital 8 track like a Roland VS 880 or something. You are
limited to 8 tracks in the final mix because that's all the unit's processor
can handle. This is fairly limiting if you want to record several passes of
the lead vocal and comp (assemble) the final track from the best bits of
several passes. So, what you do is record several virtual tracks and
assemble them into one track using the boxes editing functions. The virtual
tracks only use up storage space on the hard drive or zip drive- since you
don't play them all at once, they don't require the processing power needed
for the higher track counts.
Another use is if you want to record 16 seperate tracks and squeeze them
into the final 8 track count. Record your 16 tracks, and do some bouncing to
get the final 8 tracks. Unlike tape, bouncing to free up additional tracks
is not irreversable- the original seperate tracks will still be available as
virtual tracks, at least until you start to run out of disk space.
Clear as mud, huh?
Mike
The Axeman (##(===>>
-----------------
Sample Rates Why?
back to Sound Card Recording
hi Sonnet,
The 44.1 / 16 bits is because most all older CD players have that as a limit to
read.
The 44.1 has to do with the Nyquest (sp) sample formula. It says that in order
to reproduce a sine wave, pure tone, it must be sampled by at least twice
the frequency of that which you want to convert into a digital waveform and then
back into the sine wave. 44.1 by half is 22.05 simple math. 22.05 Hz is way
beyond what any human with normal hearing will detect. However, it is important to
sample way beyond what is desired because the harmonic content which is many octaves
above the root or fundamental frequency have an effect on the lowest harmonic
and all of them in between.
The 16 bits allows for a much wider dynamic range in volume. Higher sampling
rates and longer sampling words, 24 bits, provide more room to work with when you have
more audio sources as well as provide even greater dynamic range.
Since you can hear your guitar from the sound card, it does have a preamp. That
is the main difference between the line input, between 100mV, and 210mV, and the
mic. level input, 10mV to 50mV. A microphone that is hooked up into the mic. input
does not have enough voltage output for the mixer amplifier to see, so it goes through a
preamp. That gets it into the voltage range of the line input. There is also a price paid for
this. It is called noise.
Check it out. Turn the mic all the way up without anything plugged into the
mic. Listen to the noise level. Do the same with the line level and compare the two. More
expensive audio cards do a better job an keeping this noise to a minimum but it takes more
electronics and board layout design to keep it lower.
Bill
----------------------------------------
One person's opinion on 24-bit 96K (trying to be clear by simplifying
the technical details ... gurus please forgive):
Computer arithmetic has limited _precision_. meaning, that each
number is only a certain number of digits "wide". Imagine for a
moment that I have a computer whose numbers are 4 digits wide (we'll
use decimal digits for simplicity here, but the argument is the same
for Binary digITs, or "bits"). If I divide 1.000 by 3.000, my
computer stores 0.333. If I multiply that result by 3, I get .999,
NOT 1.000. The difference is called truncation error.
If I perform only one arithemtic operation on a number, the error
will only be as large as least-significant (smallest value) digit,
the one on the far right. As I do more operations on the number, the
errors accumulate, and the error creeps farther to the left, into the
more-significant digits.
The original CD standard was meant for recording and playing, for
which 16 bits was deemed adequate. Now we are doing "digital signal
processing" on these signals, which is actually a huge number of
arithmetic operations on the same set of numbers (the samples). As
we built longer and longer pipelines, we need more and more
operations -- with more and more accumilated truncation error.
By working with 24 bits, we try to keep the truncation error farther
away from our ears, because the accumulation starts at the 24th bit
instead of the 16th. In principle, we ought to get better results
even if the final output is truncated to a 16-bit CD.
A similar argument (but somewhat more complicated) can be made for
upping the sampling rate to 96K. Basically, the more data we have,
the more signal processing we can do on it without accumulating
audible arithmetic errors.
HTH,
-- Joshua
--------------------
-------------
Hey All,
I'll interject a few comments, in here, with regards to this. There are a
few things that are, I believe, a bit misunderstood, here with regards to
sampling and A/D conversion.
First, bit depth (i.e. 16 bit, 24 bit, etc) has nothing to do with sampling
rate/frequency. Nor does it have anything to do w/ the Nyquist frequency.
Bit depth has everything do to w/ how "accurately" a specific level is
sampled. The more bits in the sample the more accurate the actual digital
data can represent the level of that single sample. Of course, the more
bits that represent the same, the more space it takes to store those bits,
as well, and the more processor power required to handle them. To put it
another way, the more data that you have to represent a certain something,
the more accurately the entire something can be reconstructed, in the end.
In this case it's a single sample at a specific period in time that will
need to be reconstructed. Bit depth could is what we use to represent
amplitude.
Doing some math... 16-bit audio will break up the input waveform into 65,536
discrete levels. 24-bit audio will break the input waveform into
16,777,216 discrete levels. You can see where there's a bit more accuracy
in actual amplitude measurements between 65,000 measurements and 16 million
measurements...
When reconstructing the original waveform the fewer the bits that you have
in the sample, the more "errors" you're going to end up with when you do the
D/A conversion. These errors are called quantization errors. This is due
to the fact that the input signal wasn't broken down (level-wise) into
enough components and the reconstructed image doesn't totally match the
original.
The sampling frequency (which is where this Nyquist stuff comes in) is the
rate at which these various samples are collected. The Nyquist theorem
basically states that in order to get an accurate sample of anything you
must sample at twice the rate of the highest frequency contained in the
material. What this does, in essence, is captures most of the sound energy
in the "range of hearing" accurately. But beyond that, it starts to get a
bit "fuzzy". Think of this... A CD is recorded at 44.1kHz. One half of
this rate is 22.05kHz. Even sampling a 20kHz signal the sampler would only
get small bits and pieces of the original wave form and not a good enough
representation of the entire thing. Eventually, over time, due to the fact
that the input waveform and the sampler are running at different speeds
you'd eventually get enough points of data to reconstruct a portion of the
input waveform. But it's not going to be entirely accurate.
Obviously, again, the lower the sampling rate (i.e. 32kHz versus 96kHz) the
fewer samples that are going to be collected. The fewer samples collected
the less accurate the data, regardless of the bit depth. This is due to the
fact that the sample rate determines how much data we get along the time
line. The fewer the number of samples, the less data we're going to
collect over time and the less we'll have to reconstruct the original
waveform. At 44.1kHz, 44,100 samples are being collected every second.
At 96kHz, 96,000 samples are being collected every second. You can see
from this, again, when you're collecting well over twice the number of
samples, every second, you're going to end up w/ more accurate data in the
end.
Sampling audio data at 96kHz allows us to fairly accurately reconstruct from
20Hz to 20kHz w/o losing much of the upper-end data. Using deeper bit
depth allows us to more accurately translate the level. Using more
samples, with greater bit depth allows us to make more time-based samples,
this reconstructing both the time data and the amplitude data in a more
accurate way.
Hope that this helps... Questions, bring 'em' on.
Dar
Thanks Dar once again you are a wealth of information!!
B.Terry
--I do not believe the bit depth has anything to do with the frequency range.
The frequency range only has to do with the sampling rate. To avoid aliasing
when going from an analog signal to a digital signal you need to sample at 2
times the highest frequency you want to capture. The Nyquist frequency is
the frequency that you sample at to accurately get back in analog what you
converted to digital. When the CD format was developed they had many issues
to wrestle with. One of them was How much data can we physically stuff on
one of these CDs given our current technology? Another issue is how good do
we want it to sound? You could crank up the bit depth and the sampling rate
very high, but then you would only be able to stick one song on the disc!
:-) So, the engineers who designed the format determined that most people
can not hear anything above 20kHz. So, they padded their chosen range a
little bit (2K) and the 44.1K is the 2 times the sample rate I mentioned
before. The bit depth was chosen because if they went to 24 it would
serverly restrict the amount of music they could fit on a disk. The bit
depth also determines how accurate the analog to digital conversion is. The
higher the bit depth the more accurate. The CD format specification creators
compromised and settled on 16 instead of 24 or 32 bits.
Here is the math.
for 16 bit audio 60 minutes of music would take up 635 MB of space.
(60 min) * ( 60sec/ min) * (44.1K samples / sec) * (2 bytes/sample) * 2
channels
24 bit audio for 60 minutes would be 953 MB of space. That's 50% more space!
(60 min) * ( 60sec/ min) * (44.1K samples / sec) * (3 bytes/sample) * 2
channels
The reason the pros record at 24 bit and then mix down to 16 is because when
they have so many audio tracks they are dealing with. If they are all at 24
bit and you SUM them all together in your mix you will introduce less error.
If all the audio tracks before the mix were at 16 bit, the larger errors of
the 16 bit samples could be cumulative and really make things nasty for the
folks with discriminating ears.
DVD Audio is being defined now. You will be able to buy your next SUM 41
album on DVD someday instead of CD. You will be able to play DVD audio back
at 24 bit! It is supposed to sound better. You probably wouldn't be able to
tell the difference on a boom box or car stereo. You would probably need
some expensive pro gear to hear the difference.
Tom
-----------
easiest way to look at this sampling thing is to think about graphics.
There is 2 bit graphics where all you have is black and white. There is 16
bit graphics where you get 65,000 colors, 24 bit is 16 million. The more
(higher) you sample the closer to a "real life" image you get. I guess
graph paper would be the best analogy of sound sampling. The lower your bit
rate/sampling rate the larger to individual squares on the graph paper. The
higher the bit/sampling rate the smaller the squares. If you're trying to
accurately reproduce a wave by filling in individual blocks, which paper
would you use? The larger the squares the more "jagged" and lossy the
reproduction is. Does this help for all you non-math people?
Shameless Music Promotion...
http://mp3.com/joe_rocker
----------------------
---------------------------------------------------------------------------------------------------------------
Quantizing
I am following your conversation and I find it very educating even though I don't hear any difference between 16 / 24 bit samples. I have one question. Somebody mentioned quantizing. I saw a QUANTIZE option in Cubase VST which I use for recording my stuff. What does quantizing meen? What does it do to the tracks in Cubase?
Thanx bostjan
---------------
I don't use Cubase, but I use Cakewalk. So, let me take a guess.
In cakewalk quantizing means your notes so they can only fall on certain beats or parts of a beat. For example, Lets say you are going to record in MIDI a piece that is very similar to the opening of Van Halen's Running with the Devil. Those opening bass guitar beats are quarter notes. If you knew that you were going to be playing quarter notes you could tell your software to snap any notes that are slightly before or after the beat to the nearest quarter note.
This is what Quantize means in Cakewalk, I am guessing it is similar in Cubase. This is only for Midi recording. The quantizing refered to in other emails in the context of analog to digital conversion is different. That has to do with how many discrete representations of an analog signal you can have. The higher the bit rate the more discrete levels of representation are allowed and therefore the more accurate it is.
8 bit recording would be less accurate because you would have 2^8 = 256 different discrete levels of representation
16 is quite accurate at 2^16 = 65,536 levels
24 is even more at 2^24 = 16.7 million levels.
When I say levels I mean this. Lets say your guitar signal goes from 0 to 1 Volt and anything in between at all different frequencies. If you drew that signal on graph paper, you would need 256 lines on your graph paper. Each row on the graph paper would be an allowable digital level. With 16 bit recording you could have 65K lines. That's a lot of lines and sounds pretty accurate, doesn't it? At 24 bit you would need 16 million lines on your graph paper. Each line could be a valid digital signal level.
- Tom
see Sample Rates Why?
----------------------
Bostjan-
Quantizing means the software looks at the notes in the track (or whatever area is selected), and then aligns the notes to the nearest value you define. Say you have tapped in a midi drum track, but you got a little sloppy and didn't hold a steady beat. You could quantize the track by specifying, say, the nearest eighth note. That would take all the drum hits in the track (or however much of it you have selected) and align them to the nearest eighth note. No more sloppy drum line! Usually you can specify how tight you want the software to align to (in % usually), and also you can quantize note durations, too (by % as well). All of these things help tighten a track up, but by specifying, say 75 or 80% quantize, the software will only move the notes 80% of the way towards the nearest eighth note and adjust the durations by 80%- that keeps the track from totally sounding like a machine (like it would if you put everything exactly on each eighth note) .
Hope this helps-
Mike
The Axeman (##(===>>
-----------------------------------
Thanx Mike and the others. You realy helped me with this. I would like to say that this list is great. I learned a lot here.
-----------
i heard on the grapevine that on Metallica's black album, they spent months manually quantizing every single hit of of Ulrich's drums - Let's face it, the guy does need some help!
james
--------------------
Volume
Hello,
I do have 2 questions about the volume output from the RP 2000.
I really hope that someone can help me with it.
1)
Every preset has to be configured. The output volume of every preset is
different. Naturally the volume output for solo's is higher as for rhythm.
But, does anybody know how I can control the output volume in a way that
every preset has the same output level (you hear), with exception for the
solo presets?
2)
I have noticed that's possible the output level (depending on the
configuration of the preset) is to high/strong for my amp (guitar input).
Result; my amp starts to bounce or the sound is very not the sound I
programmed. What must I do to sure it doesn't happen.
Last question: Is it possible to connect the RP 2000 to the loopconnection
(send/return-connection) of my amp? I ask this because I don't see any
connection on the RP 2000.
Thanks in advance
Greetings,
Dimitri
----------------
Dimitri-
To answer your questions-
1) This volume difference between patches is the biggest problem in the RP2K
in my opinion. I can't believe Digithech let the unit out the door this way.
On order to work around this problem, you have to juggle the Patch Volume
parameter (the one at the end of the Reverb column in the matrix) and
sometimes the Amp Volume parameter (this effects the sound a little,
though). The default Patch Volume is 99 for everything. Find the softest
patches you use, set them at about 85 or so (I always like to have some
headroom!!), the adjust all the other patches from there. Good luck- I'm
still not entirely satisfied with this aspect of the unit!!
2) Use the output knob on the back of the RP unit to set the gain of the
output stage so that the loudest patches you have don't freak your amp out.
Adjust from there.....BUT:
3) The problem in #2 above will go away if you run your guitar into the RP,
and then the output of the RP into the Effects Return of you amp. Set the RP
to Mono, and turn off all of the cabinet modeling (your amp has it's own
cabinet). This setup gives you the best sound out of the RP (in my opinion,
anyway). The down side is that this setup bypasses the preamp section of
your amp, so the volume and eq knobs on your amp do nothing. You are
essentially using your amp as just a power amp. If the distortion from your
amp was a large part of you sound, you may not like this config because
it'll bypass the gain on your amps preamp as well.
One more thing- to allow for lead and rhythm volume differences, you can do
one of two things: either assign the Patch Volume to the foot pedal and
control the volume from there, or you can assign the volume to the Control
Footswitch and have that bump the volume up when you step out for that big
solo!
Good Luck,
Mike
---------------------
Hi Dimitri:
>>The output volume of every preset is different.
The best way to do is program the presets with a headphone and set all the
patch's "Overall Volume" to what your ear perceives is right output level.
I have the same problem as you. Thats one reason is I always assign the
volume pedal to volume post. I am thinking to buy one extra volume pedal.
That will give me the freedom to assign the expression pedal to what I want.
Sonnet
--------------------
Hi all
On Edit mode, i modify a Preset level to, say 75.
After that, i assign my Expresseion pedal to PSTLVL, say max. at 99, and
min. at 50.
Does assigning the exp. pedal Overrules the Preset level done in the Edit
mode ?
I'm confused.
Yesterday i changed again my Preset level with edit mode, and as soon as i
touched the pedal, all my settings changed..
Am i using this whole thing correctly ?
Ideally what i'd like is to have a "Master volume" For each preset, then
having my expression pedal be the Max of that Master Volume, and the Min be
something lower.
thanks
Alain
----------
Alain-
I had this exact same dilemma when I was trying to set up the pedal as a
master volume controller. The short answer is yes, the expression pedal will
override the patch level. So- if you have set the patch level to 75 because
that makes it equal in relative loudness to the patches around it (and this
is my biggest complaint with the RP2k- the very wide differences in relative
volume in the amp models), the you want to set the max for the Post Level
assigned to the pedal 75. Please note that this is independant of pedal
calibration. Also, it helps to have the pedal update function selected so
that the unit reads the pedal position when you change patches.
All of this should have been covered in the really crappy manual, but
wasn't. It took me a long time to figure this out, and even now I'm not 100%
sure I thoroughly understand it. What I just told you is based on how the
unit seems to work for me- I've never seen it covered in writing anywhere!!
Mike
The Axeman (##(==>>
--------------
------------------------------------------------------------------------------------------------------------------------------
How Do You Run Your Unit in line?
or Use Your effects out--in for the rp unit
Is anybody out there using any pedal boards (mine is RP2K) going into the fx loop of a Fender Hot Rod Deville? Mine's a 4x10, if that matters. My real question is this: how do you string things together?
Is it like this:
Guitar->Amp->Board (thru amps fx loop out)->Back to Amp (through fx-loop in)
Or maybe like this:
Guitar->Board->Amp (thru fx loop input)
Or maybe something I haven't thought of yet.
TIA for your help.
Scott
----------
Better way : plug it into the fx-loop. My amp - Peavey audition 110 - doesn't have one, but it has a CD/TAPE input that is located just before the power amp in the signal chain. If you plug it in the normal input, you'll be using two preamps before the power amp - the Digitech and the amp itself. Maybe your volume controls and tone settings might not work - it's normal, since you're by-passing the preamp section. You'll have to control volume/tone with your digitech (and that's a boring thing...), but you will sound waaaayyyyy better...
Felipe
-------------
Wich preamp do you want to use? If you want to use Fender preamp and leave RP2K just for fx, use the first option. Otherwise, if you want to use the RP2k preamp section, use the second option. Keep in mind that if you plug your RP2K in the normal input (not in the fx-loop) you'll have two preamps before the power amp.
Felipe
----------------
<< However, by routing FX send-->RP-->FX return, you can then take advantage
of an amp's channel switching feature or "boost," if available, to provide
another way to vary one's sounds. >>
I forgot to mention that I use a Boss DS1, with distortion set to zero this
way: guitar-->DS1-->RP2000-->amp. I finally get the sustain I'd always wanted and
that extra boost for wah-wah or slightly louder soloing in a way that the RP
alone couldn't. I sometimes run the RP2000 in stereo and use two amps, a
Fender 1-12 tube HotRod Deluxe (contradicting myself by running the RP into
the Power Amp In jack) and a Marshall MKII 50 watt (no master volume or
channel switching feature) into 2-Celestions Vintage 30's. Throwing an AB box
into the mix allows me also select one amp over the other, or combine both.
Each provides a different tonal spectrum and combining with the FX units I
get an enormous variety of sounds. But I still want a 2120VGS!!
Ken
--------------------
Hey there Scott,
Ive got a hotrod deluxe 1-12. I run the guitar into a CryBaby to a morley a/b/y box, One signal into the rp2k, one into my ART preamp, the rp2k goes out into a stereo volume pedal , from there a single run to one of the inputs on the hot rod deluxe. That leaves the other to go to the pa board.
The Art goes out direct to the other input on the hot rod deluxe. these levels are adjusted for_even_ before they get to the amp. It is so slick for live.
For some reason when both inputs of the hotrod are used, it changes the voltage reguirements and the sound will sound better (awesome). It will only go about half way up, before that feedback squeel thing happens ( the volume on the hot rod).
I also use a morley volume pedal at the preampout/powerampin. , just the volume pedal there, it allows me to control the total sound output volume. and run the input hot, I dont have to touch my amp once, after inital volume settings.
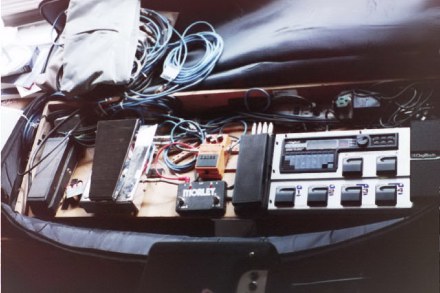
All this is mounted on a pedal bourd 4' long and a cable bundle of 6-25 foot 1/4' cables and one mic cable cannon plug(for the talker/mic ) also powerstrips on board so there is just one power cord( for all the warts and power supplies ect).
It sounds like a lot to deal with but it is easy now just show up and plug in. (I labeled all the cables with - where they go to lables.) 6 plugs, some power, adjust the board volumes (which usualy is allready still adjusted) turn the amp up for the show and run the morley vol pedal up and play. It is so loud and tubey, I love it
so good luck
Barefootterry
If you want to try just turn the volume on the rp2k down to just about on and plug both (stereo) into the volume controled input on the amp turn it up just before the squeel. Use a volume pedal at the effects loop. then turn the rp2k up till it feels good.
Ok I have since dumped this set up, for a more streamlined version. The crybaby into the ds-1 into the low input on the Marshall 4010. The volume pedal then the rp2k, set at the preamp out/ power amp in. This is routed through my pedal board cable package and is simple to hook up. 5 plugs, one is the guitar. and total control. Isnt that what man is after anyway? haha
I rewired my Sunn folded 2-15 sh, to run in 16 ohms (I prefere 4ohm's but this way I loose a cab.), so it pluggs right in and I dont have to have still another cab to run in series to get 8 ohm.
B.Terry (with a keyboard soft case)
----------------------
Hey Scott-
I've got an RP2K, and I use the second option you mentioned-
guitar->board->FX return on amp
It bypasses all of your amp controls (except maybe the master volume depending on your amp), but it sounds best this way. Oh yeah, leave the cab emulations off.
Mike
The Axeman (##(===>>
GZS Muzik
www.gzsmuzik.com
-----------------------
Hi,
I just found out about this list and, like Kevin, am new to this
processing thing. The advice presented on this list is really helping speed
the learning curve!
My question sort of relates to Kevin's. I have an RP 100, an
original Cry Baby, and a Peavey Classic 30 Tube amp that has clean,
distortion, and F/X loop. Right now I am running it all in line with the Wah
first and then the RP. My question is does it matter if the wah comes first?
It seems to sound different when changing the order. I also haven't had much
luck with the F/X loop. Do I need to use the whole send/return loop or just
plug the RP into the return and the guitar into the main input? There are so
many combinations I'm going nuts figuring it all out. Any help would be most
appreciated, thanks!
Eric
-------------------
Hello Eric,
Regarding the wah: Where you put the wah depends on what sounds you want
to hear or produce. With the wah in front you're affecting only the guitar
natural sound, which most people want. If you place the wah after (or
behind) the rp then you will also affect any and all of the rp FX.
Personally, it sounds better between the guitar and rp.
My set up goes guitar-->mixer-->AUX out (SEND on amp)-->wah-->Boss
SD-1-->rp7-->AUX in (RETURN on amp)-->recorder......... It works for me
best that way, although I haven't tried putting the wah in front of the
mixer...??..something maybe worth trying.
Regarding FX loop: guitar-->[wah]-->amp-->(SEND)-->[wah]
-->rp100-->(RETURN). (The wah is [bracketed] because you should be able to
put it either place depending on your personal tastes.)
If you don't plug the SEND into the rp or wah then the signal won't be
routed through the processor.
Hope this helps.
Sean
------------------
Hi Eric and everyone on the list,
the wah problem is just a matter of getting the sound you like the
most. You're going to have to try all the combinations possible and when you
hear that sound that is just right you'll know you've found the sound you're
looking for. What regularly people do is they place the wah first in the
chain. This way it just sound better. This is so 'cause the is intended just
to modify the sound coming out of the guitar. If you place the wah after the
rp, when you use the wah you'll be modifying the things that are coming out
the rp too. That tends to sound kind of weird and sometimes, it sounds
exaggerated.
Regarding the F/X loop, if you plug the final output of your effects
loop into your amp's f/x loop return jack, you'll be by-passing your amp's
pre-amp. Since the rp already is a pre-amp this isn't mush of a problem,
unless your want to use your amp's gain channel (distortion). Inevitably in
this situation you're going to have to send the output of your f/x rig into
the input of your amp. If you do that the basic way to connect your rig will
be guitar into wah, wah into you amp's main input, your amps f/x loop send
to rp input, and the rp's output to your amp's f/x loop return. One nasty
thing that could happen when you plug your f/x rig directly into the f/x
loop return jack, is that the level could be very low and you won't hear
mush.
Hope this helps and doesn't give you a headache ;-).
/Cheers
Marlon Hiraldo
-------------------------
I'm contemplating a new amp that has an effects loop, and i was
wondering if anyone using there RP100 in the effects loop?
It says this in the manual.. "Note: When using a guitar amp it may be best to connect the guitar to
the input of the of RP100 and the OUTPUT of the RP100 to the effect
return of the amp".
Rob
------------------------
Hi Rob-
I have an RP2K and that's how I use it-
guitar-->RP-->amp effects return
Since the RP is an amp modeling system, all you really want the amp for is,
well, amplification!! In other words, you want it clean, not coloring the
tone. I use a Fender M80 Chorus Combo (2X12, Stereo, 35 watts/side). It
actually has both a mono send/return and a stereo send/return. This is
pretty rare, and I'm just lucky it worked out that way (I got the amp long
before I got the RP2K). So- live I can either set the RP to mono, run my
guitar into it and the left RP out to the amp mono return and the right RP
out to the board (the left and right outs of the RP are the same in mono
mode) OR, I can run the guitar into the RP, set it to stereo, run the
left/right out of the RP and into the stereo return of the amp, and then mic
the amp.
Something you might want to check out is the new Tech 21 amp- I forget the
name- but it's DESIGNED to use with modeling type processors like the RP's
Hope this helps-
Mike
---------------------------
Rob,
I think the manual is simply implying that in ALL cases the guitar
should be plugged into the RP rather than the amp. Then, the RP can be
plugged either into the amps main input or the effects return.
I'm not completely sure, but it seems like it is always preferable to
just have the very mild electric current of your guitar going into the
RP rather than the relatively higher output of your amp's preamp, which
would be the case if you had the guitar plugged into the amp and the RP
into the effects loop of your amp.
This would be "wrong:"
Guitar --> Amp <==> RP (in effects loop)
But either of these would be "right:"
Guitar --> RP --> Amp (main input)
Guitar --> RP --> Amp (effects return)
Hope that helps. It may not be correct, but it's the way I understand it
(and it works for me).
Glenn
--------------
Actually I'd like to be able to do two things, have some patches setup using
the amp models and some patches setup not using them.
On the patches without amp modeling I want to use the 'natural' sound of the
amp, (It has killer distortion!).
On the patches where i use the amp models, i'd like to keep the amp sounding
rather generic.
All around I want to use the amps built in reverb, which i guess is ok either
way, because reverb goes behind everything else typically.
Now what if I ran out of the guitar into an A/B switch and did both setups?
Rob
------------------
Use Your effects out--in for the rp unit and keep your amp pre's sound
and more How Do You Run Your Unit in line? and see volume
for, Placeing effects in order. Nice ideas!
-------------------------------
Hello All,
I have been reading this list for a while, and I am amazed at the
knowledge base there is here -- and the willingness to share it! I am
relatively new to the electric guitar and effects processing worlds, so
I have what are probably some basic questions. First of all, my
equipment, modest though it is: Rickenbacker 360WB, Vox Cambridge 30
Reverb (not the twin), Digitech RP200 and Korg PX-3 Pandora. The
Pandora was a birthday gift to me, and I use it mostly for headphone
practice and just "funnin'".
My first question is what is an "effects loop"? Do I have one with my
equipment? I don't think I do because I find nothing marked as such,
but having hooked up graphic equalizers through a tape monitor loop on
ho-fi equipment, I realize there may be some way to do this. What I do
now is simply plug my guitar into the RP200, and take the output into
my amp's input. I use channel one which is the solid state channel (I
think anyway), and I have my bass/treble controls for this channel set
at 3/4 or so. Is there a better way to connect myself to this amp?
Regards,
Steve
------------------------
Steve,
hey the effects send/effects return,,,, or some amps (like mine) have something called pre-amp out/ power amp in. there close to being the same. the effects send /preamp out are usualy plug sockets, 1/4"holes, on the back or frount of the amp some amps have this and some dont. there usualy marked.
the effects out and preamp out are, points at which to run to another power amp, to chain amps, or to run to a record input, or to the house pa, or actualy run through effects too, there are alot of things you can do here. the use of the effects send is transparent to the output of the amp your useing. It is a tap on the preamp of your "amplifier", combo, ect...
The effects return/ poweramp in, is a different animal it is ,(in the case of the effects return, the way back for the effects send where ever you sent it, it does not have to be used, if the effects send is used, it can , not be used or used, it is also sometimes controled by a on/off switch, or a gain pot.
The poweramp in is also an a effects return but this baby disconects the preamp of the "combo,your amp" you are useing,(that is the internal preamp or the pre section of your combo,amp) by just pluging a plug into it, and usualy has no gain control.(this is changeing latley) so you are by passing the preamp or your amp,combo, and just useing the internal amplifier section of the combo,amp.
These are very handy and worth every cent in the useage dept.
As the technology moves on, it sort of goes backwards to the use of seperate preamps and amp of the late fifties when the hi fi revolution happened.
Tube amp hall of fame
B.Terry
-------------------
I recently purchased an RP200. I'm very pleased with it. It has definitely
> added some dimension to my playing sound, although several of the presets
> are really useless. Programming it is a cinch.
>
> I'd like to know if there are obvious sound differences between connecting
> the RP200 using the effects loop ports vs. regular input? Basically, I
> haven't bothered getting a 3rd patch cord yet. And before I do, I'd like
to
> know if there are any benefits to using the effects loop?
>
> My setup is a Marshall VS265. I play mainly Fender guitars, single coil
> Strats
Dan
-------------------
Dan,
Your best bet... take the RP and plug it into the Power Amp In (Mono Out)...
plug the guitar into the RP200 and off you go... you'll find that's the
quietest way to play thing... Using the pre-amp, from the amp, in
conjunction w/ the RP200 is going to add a bunch of noise that you don't
want (i.e. hum and hiss)... of course, depending on your style of music,
these days, that might just be what you want :-) One quick word of
advice... if you're plugging direct in the Power Amp in... watch your volume
it might be a bit loud...
Dar
----------
I've got the RP300, which is very similar to the RP200. I found that getting the amp simulators
to work through the regular input was a waste of time, I could never make anything sound good.
The other effects (chorus, reverb, delay, etc) worked as expected. As soon as I went to the
effects loop, viola, it sounded great! My advice: go with the effects loop. That's what these
units, and your amp, were designed for.
Goose1
-------------
I've been using my RP300 into a Tech 21 Trademark 10, which has its
own superb preamp section, with mixed results - too much interaction,
and lots of tweaking to get a consistent sound. I've recently bought
a Tech 21 Power Engine 60, and the RP300 sounds really good through
that - the Power Engine is basically a 60 watt power amp and single
12" speaker in a combo package, ideal for those of us who use a multi
of some sort for the bulk of our sounds.
I think the Power Engine and a GNX2 will be sonic nirvana for me (I
hear my wife going "yeah... right!" somewhere over there :)
Cheers,
David
------------
Can I use a a/b/y bow to switch the inputs of my amp to either have the rp there or the regular guitar plug?
Can I switch the input at the effects return with an a/b/y box?
ED
--------
that will work fine, every one should own at least one( :) ) a/b/y box. but you will probaly not be able to go guitar to a//b/y to amp pre,-- and to effects return. the effects return has a switch plug. that is if the effects return/power amp in, is used, the main amp pre is disabled at the effects line. the effects out will still function but will not pass through if the effects return is in use..you might use a direct patch, to use effects and not amp sims, or use the bypass to just go by all of it . In what ever set up you choose. its all in the users perfered selection preferences. perhaps the a/b/y at the effects out a-- to the rp. b-- to the effects return--- no you would need another box after. as the effects return only alows one input, you could just leave it in the a and b ...
so then that would be-- effects send into aby box , a to another aby box in,, b to the rp unit, out of the unit to the other in of the second box, out of the second box to the effects return.. just leave the second box on both, and do your switching at the first one. It just goes to show that it aint easy being easy..........
good luck,
B.Terry
--------------------
Rob,
Either way you're fine on the reverb, because that usually comes at the
very end.
You might have some problems if you split the output--you'll have the
signal coming in at both places in the chain, unless there is someway to
selectively switch between either the main input or the effects return.
I'm not sure what the results of such a configuration will have on the
final sound because I've never tried it.
Actually, there's a much simpler solution. If I were trying to do what
you're doing, I would use this setup:
Guitar --> RP --> Amp (main input)
This is no different than if you had effects pedals plugged in between
your guitar and your amp. Then, depending on whatever patch you've
chosen, you can just switch to the appropriate amp channel for clean or
overdriven. This is exactly the way I have mine setup.
Glenn
----------------------------
I posted some questions about this a few days back, and after experimenting
per the groups suggestion, I run it like this:
Tele--->Wah--->RP100--->Main input on Peavy
The advantage of this is I have the option of totally bypassing all of the
wah and RP effects and using the amp clean, or distorted. When using an amp
model, make sure the amp is switched to clean. Any single effect like delay
can be achieved using the RP and run that through the distorted channel of
your amp (or clean if you like you amp sound). This may not be the case with
your amp, but running the same configuration into the F/X return on my amp
totally bypasses ALL of the tone controls. I personally didn't like going to
the F/X return because it eliminated the option of using the tone,
distortion, and reverb of the amp itself. Sorry to ramble on, but this is
what I've discovered just by swapping cords all over. Good luck.
Eric
------------------
DS-1 Secret
Hello fellas,
Hearing a Neal Schon challenge made me remember something I saw on the official Journey website.
I believe this is the secret to Neal's incredible sound;
This is a quote from a discussion group on the Journey site.
Hey Folks,
I figure I'd share my recent DS-1 experience with everyone.
A few weeks ago, I needed to get my hands on some sort of distortion pedal to goose the crappy marshalls that I've been playing in the rehearsal studios I frequent. Anyway, I decided to get a Boss DS-1 on the thought that Neal Schon, Steve Vai and Joe Satriani all use them....it probably isn't that bad. What I really wanted to do is just simply goose the amp, just a little...so I have some smooth, sultry sustain. Anyway, I got this thing 2-3 weeks ago and I hated it. I couldn't imagine why on earth Neal, Steve and Joe use this thing. The distortion, when fed into a slightly crunchy amplifier, sounded aweful. I was just about to ebay this thing when I decided to try it a different way. Instead, I got myself a great rhythm sound out of my amp...with as much gain as I wanted. Then, I set the DS-1 to tone=0, distortion=0 level=full and
put the DS-1 in between my guitar and my amp.....the result was absolutely startling. I literally, within a minute of tweaking some amp settings, had as close a Neal Schon tone that I ever have had (and keep in mind folks, that i played in a journey tribute band and I had gotten pretty damn close a few years ago with my Boss GT-5)....
Guys, if you ever have a chance to try the DS-1, give it a try. simply drop all of the knobs to 0 except the level knob...and crank that one. And you've got sultry, smooth, liquid sustain for days.
Where has this thing been all my life?
There you go folks!
If you can emulate this setup somehow with the RP2000, let me know
Later,
Paul
 Steve Vai's settings
---------------------
Quantizeing
I am following your conversation and I find it very educating even though I don't hear any difference between 16 / 24 bit samples. I have one question. Somebody mentioned quantizing. I saw a QUANTIZE option in Cubase VST which I use for recording my stuff. What does quantizing meen? What does it do to the tracks in Cubase?
Thanx bostjan
---------------
I don't use Cubase, but I use Cakewalk. So, let me take a guess.
In cakewalk quantizing means your notes so they can only fall on certain beats or parts of a beat. For example, Lets say you are going to record in MIDI a piece that is very similar to the opening of Van Halen's Running with the Devil. Those opening bass guitar beats are quarter notes. If you knew that you were going to be playing quarter notes you could tell your software to snap any notes that are slightly before or after the beat to the nearest quarter note.
This is what Quantize means in Cakewalk, I am guessing it is similar in Cubase. This is only for Midi recording. The quantizing refered to in other emails in the context of analog to digital conversion is different. That has to do with how many discrete representations of an analog signal you can have. The higher the bit rate the more discrete levels of representation are allowed and therefore the more accurate it is.
8 bit recording would be less accurate because you would have 2^8 = 256 different discrete levels of representation
16 is quite accurate at 2^16 = 65,536 levels
24 is even more at 2^24 = 16.7 million levels.
When I say levels I mean this. Lets say your guitar signal goes from 0 to 1 Volt and anything in between at all different frequencies. If you drew that signal on graph paper, you would need 256 lines on your graph paper. Each row on the graph paper would be an allowable digital level. With 16 bit recording you could have 65K lines. That's a lot of lines and sounds pretty accurate, doesn't it? At 24 bit you would need 16 million lines on your graph paper. Each line could be a valid digital signal level.
- Tom
-----------------
Bostjan-
Quantizing means the software looks at the notes in the track (or whatever area is selected), and then aligns the notes to the nearest value you define. Say you have tapped in a midi drum track, but you got a little sloppy and didn't hold a steady beat. You could quantize the track by specifying, say, the nearest eighth note. That would take all the drum hits in the track (or however much of it you have selected) and align them to the nearest eighth note. No more sloppy drum line! Usually you can specify how tight you want the software to align to (in % usually), and also you can quantize note durations, too (by % as well). All of these things help tighten a track up, but by specifying, say 75 or 80% quantize, the software will only move the notes 80% of the way towards the nearest eighth note and adjust the durations by 80%- that keeps the track from totally sounding like a machine (like it would if you put everything exactly on each eighth note) .
Hope this helps-
Mike
The Axeman (##(===>>
--------------
Thanx Mike and the others. You realy helped me with this. I would like to say that this list is great. I learned a lot here.
--------
i heard on the grapevine that on Metallica's black album, they spent months manually quantizing every single hit of of Ulrich's drums - Let's face it, the guy does need some help! james
--------------------------